If you are a Sitecore developer and still haven’t heard about Helix, then you must be living under a rock. Just to recap, Helix is a set of software design principles and conventions for Sitecore development. For more information visit the official Sitecore Helix website.
This post is about how to set up a project from scratch using Yeoman Helix generator which is based on Yeoman. It will take you less than 5 minutes to setup your initial project.
Assumptions :
For the blog post, lets assume that I have to start working on a Sitecore 9 project for Acme Inc and I need to setup the following Sitecore projects:
- Project
- Common
- Web
- Foundation
- IoC
- Serialization
- Feature
- Navigation
- PageContent
- Search
If you have never used Yeoman before, this post is for you as I will be walking through the setup process step by step.
Step 1 – Open command line and install Yo
npm install -g yo
Stpe 2 – Install Helix generator
npm install generator-helix -g
Step 3 – Create your top level folders
I will create these 5 top level folders at location C:\Projects\Acme
- etc
- lib
- tools
- src
- scripts

Step 4 Create Helix Solution
yo helix

Select > Empty Helix Solution and press enter
Enter name of your solution – Acme
(this will be name of your Solution file .sln)

Enter location for your source folder – src
(you can just press enter to get the default ‘src’)

Select the .NET framework
(the compatible version for Sitecore 9 is .NET 4.6.2 which is not listed as an option. This is not a problem as we can change this manually from project properties, for now select 4.6.1. As this is an open source project, I could see pull request for 4.6.2 option. Hopefully that will be merged soon by the admins after the review.)

Enter local URL location

Taadaa!. This will create your solution file and also the folder structure like below:

Step 5 Create Helix Feature, Foundation and Project layer projects
I will only show the screen shots for the Web project in Project layer, as the process for creating projects in other layers is similar. Start by typing in :
yo helix:add

Enter the name of project like Web or Common and press enter:
Serialization
(If you are using unicorn for serialization – just press enter)

For source code folder name – just press enter

Enter vendor prefix – Acme

Select Layer – Project (use arrow keys to move down)

Enter optional module group – (I left it blank and pressed enter)

Select .NET framework
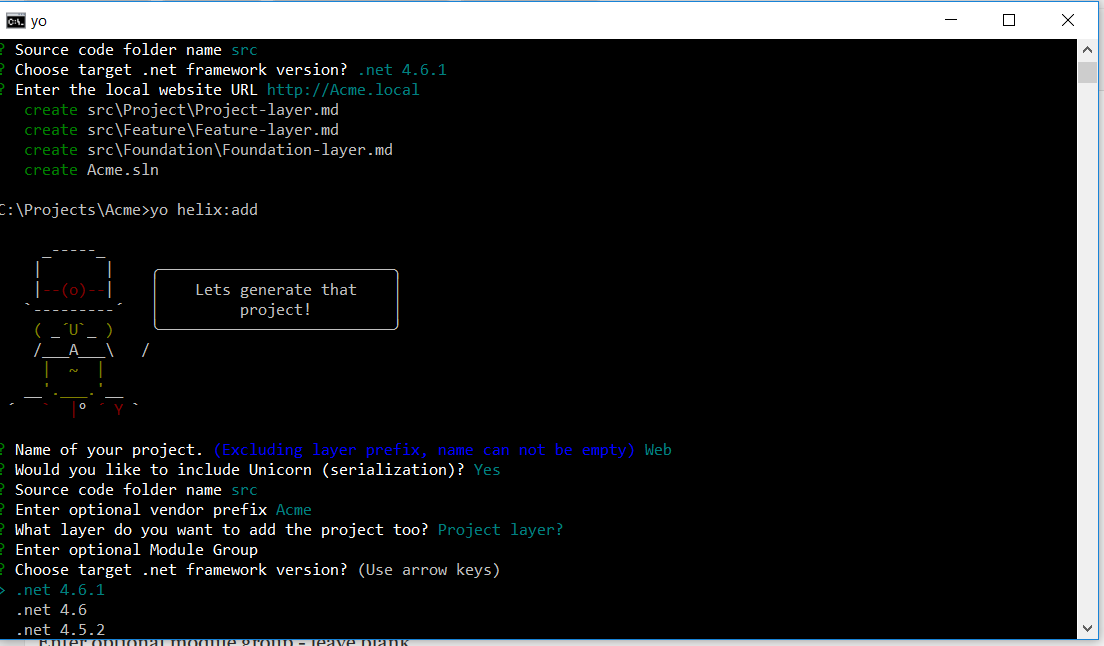
That’s it, your project is created!

The folder structure after this step should look like this:

You can repeat the same steps for other projects, the only that should be different is the Project Name in the first step, rest of the steps should be same. After I completed all the projects, the final folder structure looked like this:

Lets open the visual studios 2017 to see all the projects:

That’s it. You have setup a fully Helix compliant solution for Sitecore.

If you still don’t believe me, watch all this in a video :
A big thanks to all the admins and contributors for Yeoman Helix generator project!
Happy Sitecoring
Naveed

does it work with Sitecore 9 Update 1
Yes, that what was the example based upon!
Nice to mention, that you can customize the template what you want to create very easy is mentioned in the documentation with Extending the generator works very well and easy
https://www.npmjs.com/package/generator-helix#extending-the-add-generator